Introduction and Course Overview
One year of hard-won Claude Code experience, distilled into 52 concrete lessons across beginner, intermediate, and master tiers.
What This Course Covers
Avthar spent 12 months building real applications with Claude Code — starting from "prompting and praying" and arriving at a workflow where multiple Claude instances tackle a week's worth of features simultaneously. Every lesson here comes from that hands-on experience, not theory.
The 52 lessons are split into three levels:
- Beginner — Claude Code foundations: installation and setup, choosing the right models and modes, and structuring your
CLAUDE.mdfile for best results - Intermediate — Customizations and workflows: custom commands, agent skills, MCPs and plugins, plus the exact build/test/document workflow used in production
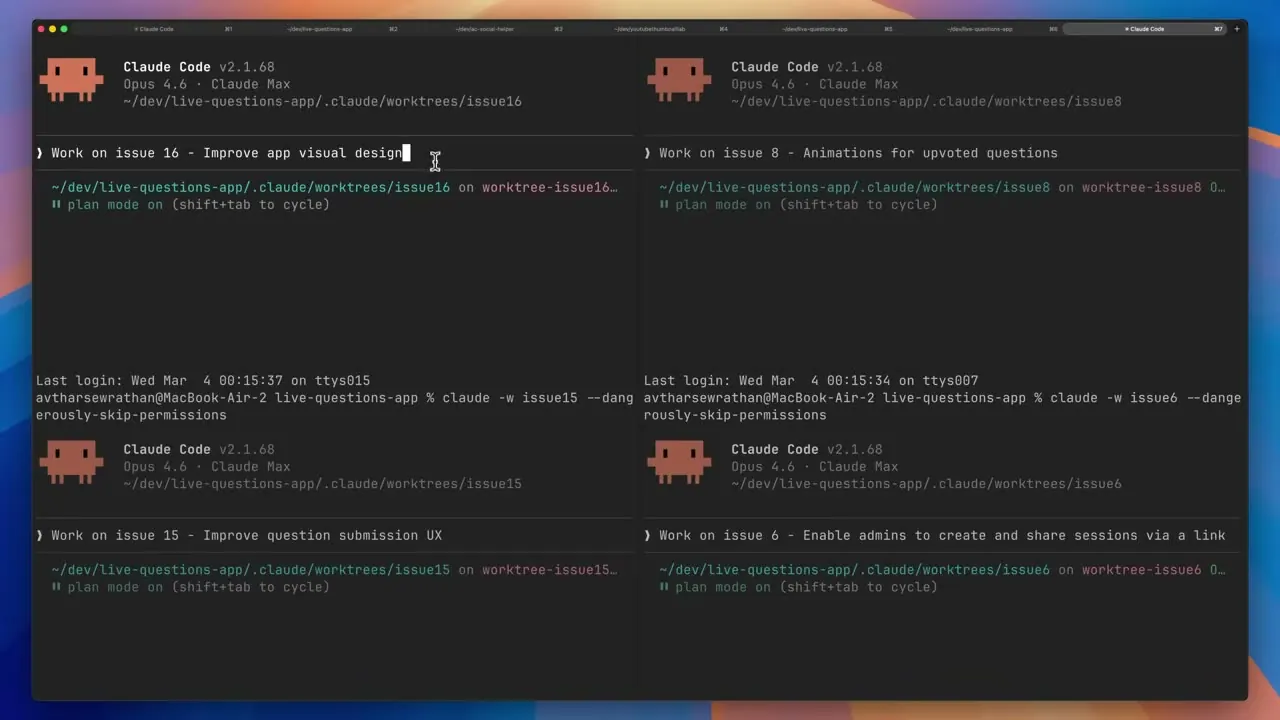
- Master — Advanced techniques: running multiple Claude instances in parallel with Git worktrees, autonomous iteration loops, self-improvement feedback loops, and delegating tasks so you return to PRs ready to review
Why It Matters
The gap between a casual Claude Code user and a power user is enormous. At the beginner end, most people are barely scratching the surface — single prompts, manual iteration, no custom tooling. At the master end, Claude handles entire workstreams autonomously: running 101 tests, summarizing what changed, and queuing the next task without hand-holding.
The jump from one level to the next isn't about raw intelligence — it's about knowing which levers to pull. As Avthar puts it, the goal is to "save you 12 months of pain" by making those levers explicit.
Installation and Access Options
Getting Claude Code running takes less than five minutes regardless of your preferred environment — terminal, desktop app, IDE, or mobile.
Tip 1 · Install and run in the terminal
The most common setup: copy the install command from the Claude Code docs, paste it into your terminal, and you're coding immediately. The same approach works on remote servers — SSH into AWS, DigitalOcean, or Hetzner and install Claude Code exactly as you would Python or Node, which is ideal for backend projects where you want to work directly on the server.
claude              # start a fresh session
claude --resume     # pick up a previous session
Tip 2 · Use the Claude desktop app
The terminal can feel like a barrier. The Claude desktop app removes that hurdle entirely, giving you "all the power of Claude Code" in a familiar chat-style interface — no terminal knowledge required. It's the recommended starting point for complete beginners.
Tip 3 · Run Claude Code inside your IDE
If you already live in VS Code, Cursor, or Windsurf, there are two ways to integrate:
- VS Code extension — a dedicated UI with buttons and menus for Claude Code's different modes and settings, embedded directly in your editor.
- Terminal panel — open a terminal window inside the IDE and run
claudethere. This lets you view file changes side by side while Claude writes or advises.
The second approach — terminal inside the IDE — is what Avthar uses day-to-day.
Tip 4 · Code on the go with web and mobile apps
The Claude Code web and mobile apps are built for async, away-from-desk work. Kick off a feature, bug fix, or question and Claude works in the background while you're away. When you're ready to test and modify, use the "teleport" feature to pull the session from the web app into your local terminal and continue from where Claude left off.
Models, Modes, and Plans
Choosing the right model, plan tier, and workflow mode is one of the highest-leverage decisions you make before writing a single line of code.
Tip 5 · Use the Best Model You Can
Claude Code offers three models with a clear trade-off between power and cost:
- Opus — most capable, most expensive; fewest mistakes per task
- Sonnet — strong middle ground between intelligence and cost
- Haiku — fastest and cheapest; best for lightweight or repetitive tasks
The recommendation is to default to Opus whenever possible. Even though it's slower, it makes fewer errors — meaning less time spent debugging and steering, so you move faster overall. If you're worried about rate limits, use Sonnet as your everyday default and reserve Opus for "the most complex or important tasks."
Tip 6 · Get a Max Plan If You're Serious
Claude Code requires a paid plan. The tiers break down as follows:
- Pro ($20/mo) — a solid starting point for exploration
- Max 5× ($100/mo) — 5× higher rate limits
- Max 20× ($200/mo) — 20× higher rate limits plus first access to new Anthropic products
- API pricing — fine when a company foots the bill, but typically too expensive for individual use
Start with Pro, then upgrade to a Max plan once you're building seriously. API pricing is rarely worth it out of pocket.
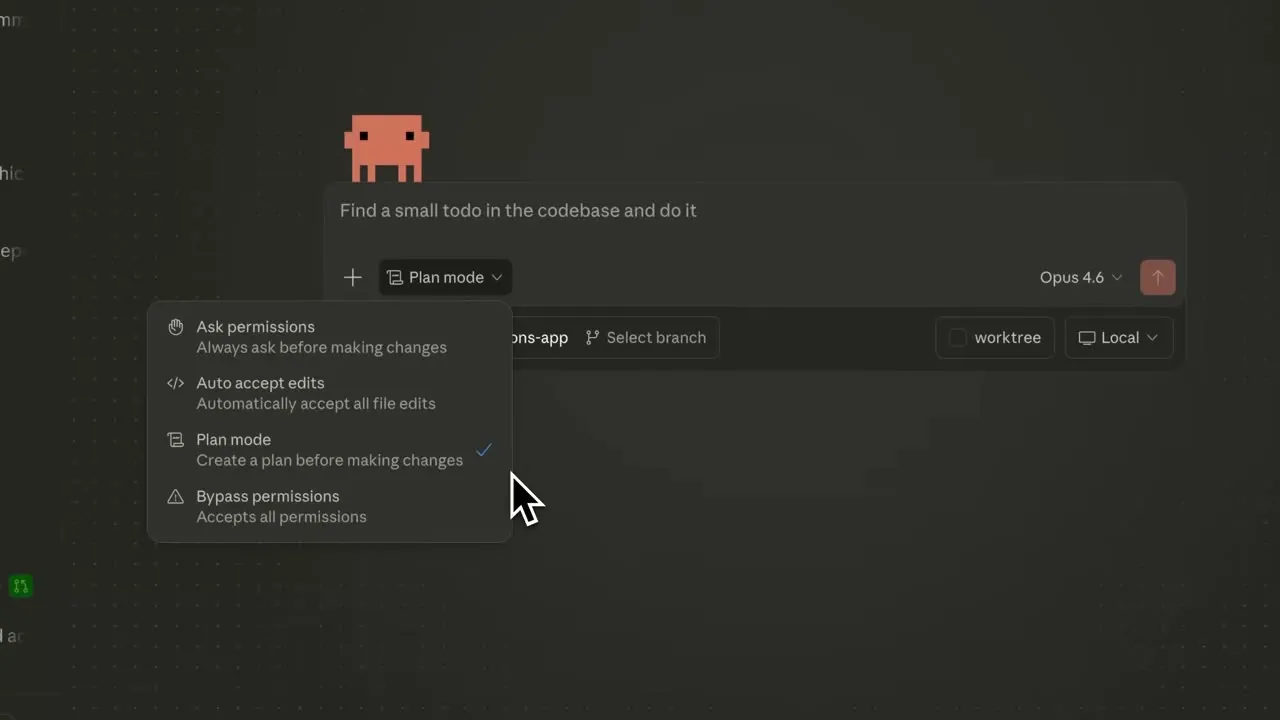
Tip 7 · Start Most Tasks in Plan Mode
Plan mode is arguably the single most impactful habit in this entire guide. Before Claude writes any code, it thinks through the task, breaks it into steps, and asks clarifying questions. This produces "way better results" than diving straight into implementation.
The key workflow: activate Plan mode, review the proposed plan, iterate on it in conversation, and only then let Claude start building.
Tip 8 · Use the Ask User Question Tool
When starting a task in plan mode, explicitly tell Claude to use the ask user question tool to surface clarifying questions. This is especially valuable when:
- Drafting a project spec from scratch
- Planning a new feature
- Making a large structural change to an existing codebase
It forces decisions to be made upfront rather than discovered mid-build.
Plan Mode, Bash, and Thinking
A handful of intermediate features — Plan Mode, bash integration, extended thinking, and the Explore sub-agent — unlock dramatically more capable and controlled Claude Code sessions.
Tip 7 · Use Plan Mode to clarify before acting
Before Claude writes a single line of code, Plan Mode forces it to ask clarifying questions. Working through those questions gives both you and Claude "way more clarity about what you actually want and what matters for the task at hand." Treat this as a free checkpoint to catch misunderstandings early.
Tip 8 · Let Claude handle bash commands
Claude's built-in bash tool lets it read and write files, search the codebase, and run git commands on its own. You stay in control through permissions — approving specific commands or explicitly allowlisting and blocklisting what Claude can run. Bash mode also lets you issue shell commands from inside Claude Code without switching to a separate terminal, which is handy for quick directory navigation or git operations.
Tip 9 · Activate extended thinking for hard problems
Extended thinking mode gives Claude a scratchpad for deeper reasoning — "extra brain space to work through complex problems." Enable it when a task involves non-trivial logic, architecture decisions, or debugging that benefits from multi-step planning before any code is touched.
Tip 10 · Invoke the Explore sub-agent for codebase search
The Explore sub-agent is purpose-built to gather context from a codebase rapidly. It runs on Claude Haiku under the hood, making it both cheap and fast. Claude Code calls it automatically when it detects exploration is needed, but you can invoke it explicitly for tasks like:
- Getting up to speed on an unfamiliar project
- Writing documentation such as an
architecture.md - Understanding existing code before implementing a new feature
Tip 11 · Ground every session with CLAUDE.md
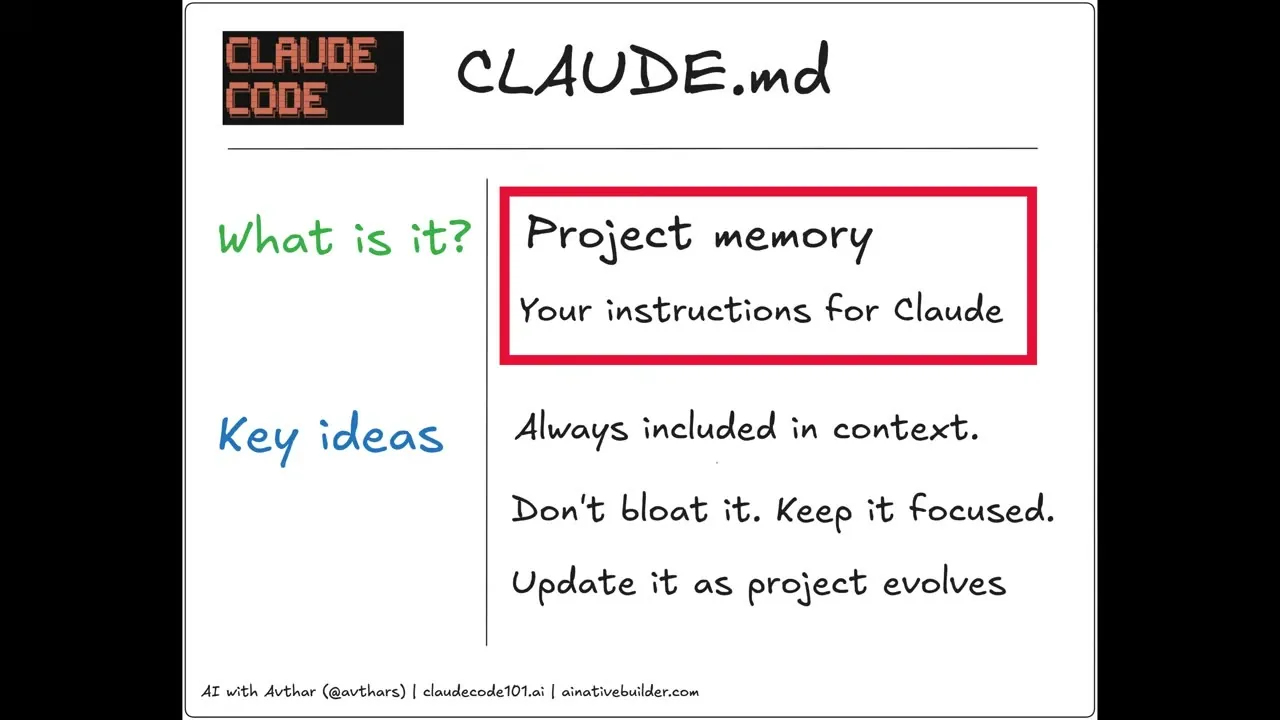
CLAUDE.md is your project's persistent memory — loaded into context at the start of every session so Claude always knows the most important information about your project.
Seven things worth including:
- Project goals
- Architecture overview
- Design and style guides
- Constraints and policies
- Repo and git etiquette
- Frequently used commands
- Testing instructions
Keep it focused. Link out to supporting files rather than pasting everything inline — include an overview of a topic in CLAUDE.md, then point to the relevant file for full detail.
Claude.md and Context Management
Your CLAUDE.md file and context window habits have more impact on result quality than almost any other beginner practice.
Tip 12 · Keep CLAUDE.md Concise and Layered
CLAUDE.md is Claude Code's persistent instruction file — it loads at the start of every session. The key discipline is keeping it short and pointing outward for detail:
- Put high-level preferences and constraints directly in
CLAUDE.md - Reference deeper docs (project spec,
architecture.md) by path rather than pasting them in - This keeps the file "concise while still giving Claude a way to access deeper context"
To create one from scratch, run /init or ask Claude to create a CLAUDE.md and use its ask-user-question tool to interview you for the right content.
Tip 13 · Actively Manage Your Context Window
Context management is a core skill. A session's context window fills up over time, and stale context from earlier tasks degrades results on later ones.
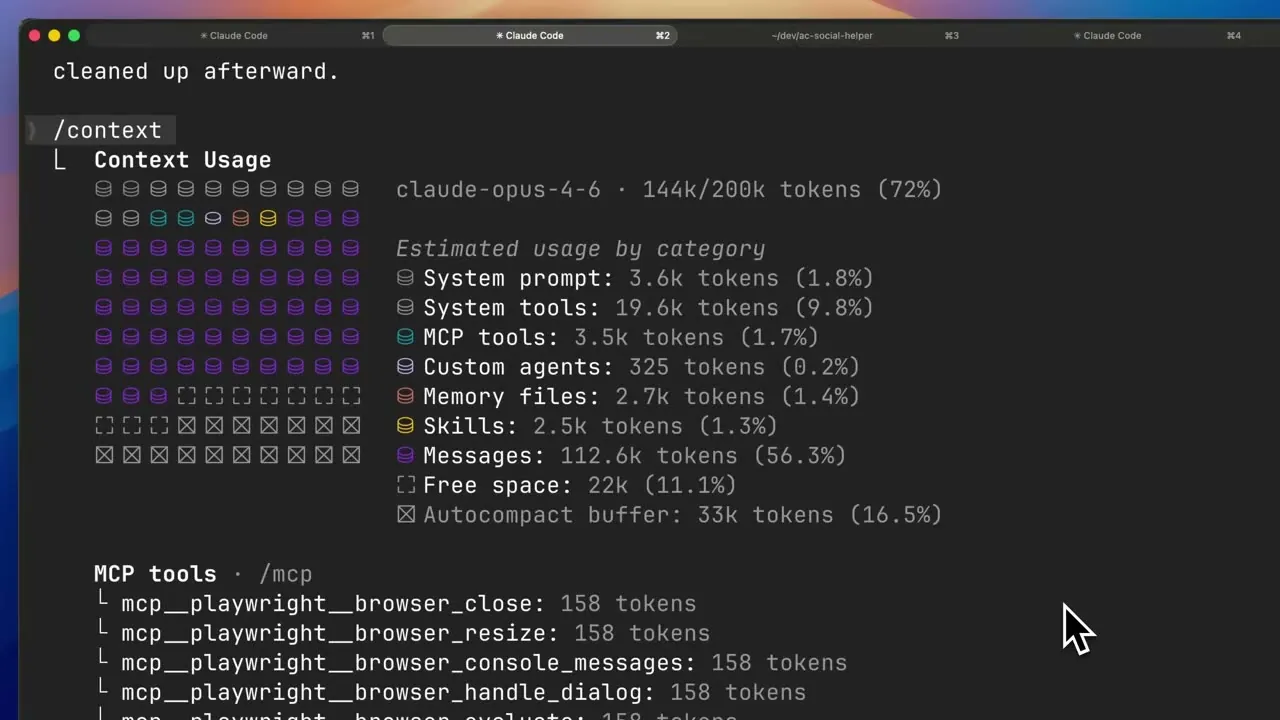
The /context command shows exactly where tokens are going — system prompt, MCP tools, custom agents, memory files, messages, and the autocompact buffer. In the example above, messages alone consumed 56.3% of the 200k-token window, leaving only 22k free.
Practical habits:
- Use
/clearliberally after finishing a chunk of work to reset context within a session - Start a brand-new session for unrelated tasks
- Avoid autocompaction. When Claude runs out of context it tries to compress the conversation, but important details get lost and results visibly suffer after compaction — avoid it as much as possible
/context   # show token usage breakdown
/clear     # reset context in the current session
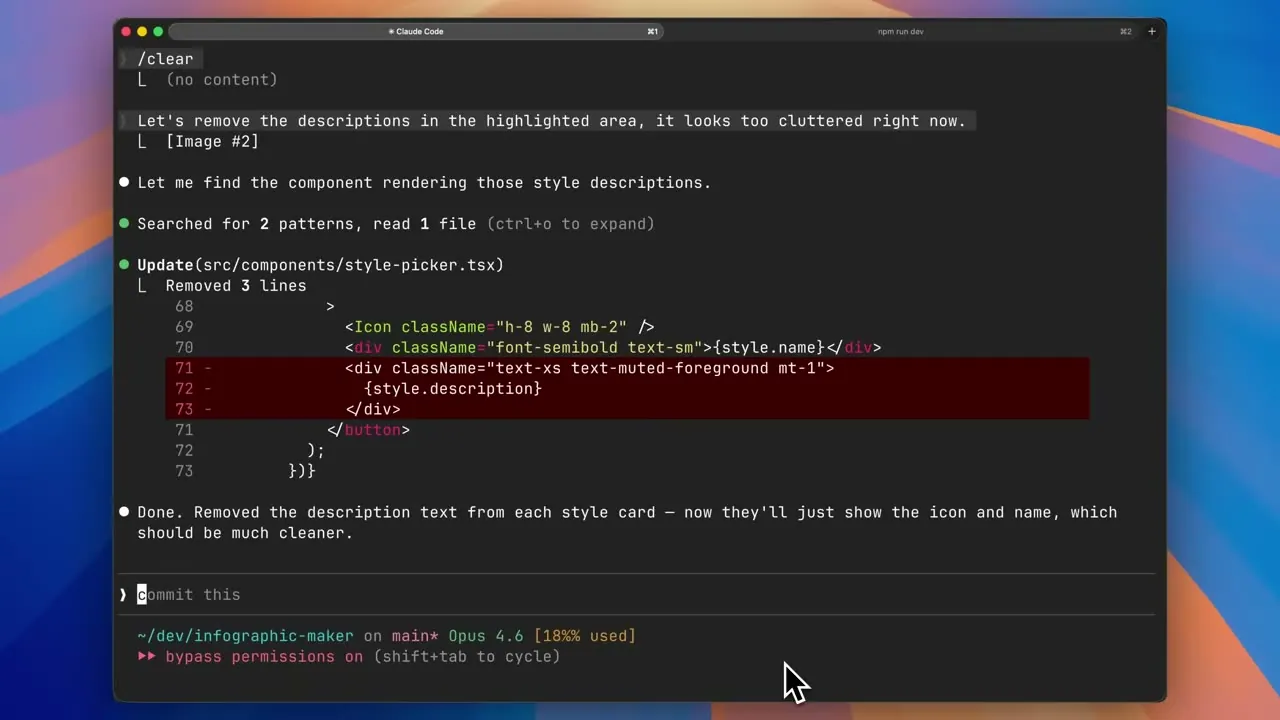
The screenshot below shows /clear used right before a UI cleanup task, keeping the working context clean and focused.
Debugging, Git, and Prompting
Checkpoints, status-line tuning, and smart prompting round out the beginner toolkit before you move to intermediate work.
Tip 17 · Treat Checkpoints as Session Recovery, Not Version Control
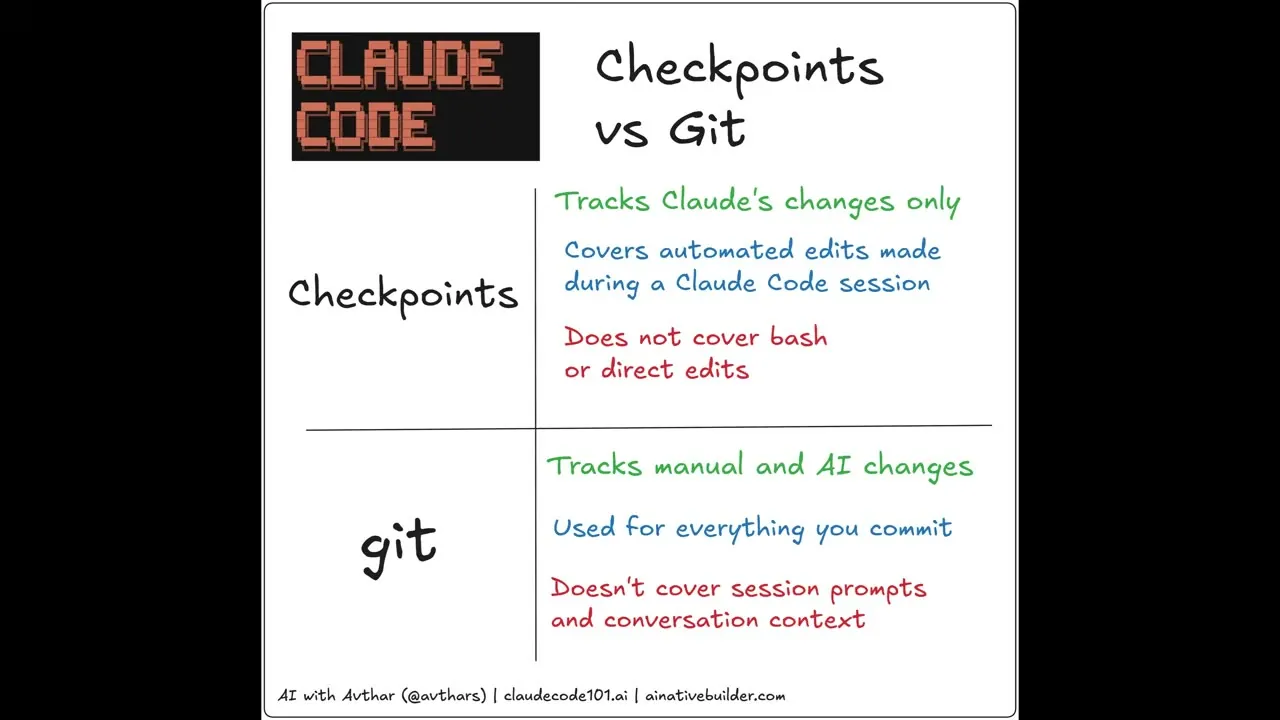
Checkpoints let you rewind Claude's changes quickly, but they only cover automated edits made during a Claude Code session — not bash commands or direct file edits you make yourself. Git, by contrast, tracks every committed change regardless of source. Use both: checkpoints for fast in-session recovery, Git and GitHub for durable project history.
Tip 18 · Customize Your Status Line
The status line shows key information at a glance while you work in the terminal. Recommended fields to add:
- Git repo name
- Current branch
- Context window percentage used
/status line # open the status line customization commandIt's a small tweak, but proactively seeing your context usage prevents the surprise of hitting the limit mid-task.
Tip 19 · Give Claude Lots of Context in Your Prompts
Good prompting is "one of the biggest levers for improving your outputs." Think of Claude as a smart colleague you're delegating to:
- Set clear goals and success criteria
- Name specific files, folders, and tools it should use
- Describe the before-and-after state you want
The more relevant context you provide, the closer the first output lands to what you actually need.
Tip 20 · When Stuck, Just Ask Claude
Claude is an always-available collaborator. Don't hesitate to ask it questions about your project, about Claude Code itself, or about which technical approach to take. "Just ask Claude" is the single highest-leverage habit for beginners getting unstuck.
Tip 21 · Use the Claude Code Guide Sub-Agent
There is a built-in sub-agent specifically designed to answer questions about Claude Code. Instead of searching the docs or getting generic web results, invoke the Claude Code Guide sub-agent — it responds in the context of your specific project and pulls current information.
Custom Commands and MCP Servers
Custom slash commands and MCP servers are the two most powerful ways to tailor Claude Code to your exact workflow without repeating yourself.
Tip 22 · Build Custom Slash Commands for Repeated Prompts
If you find yourself typing the same instruction twice, that's a signal to turn it into a slash command. Think of slash commands as "prompt shortcuts" — named, reusable prompts that can accept arguments, run inline bash, and reference files in your project.
Three examples worth stealing directly:
/create-issues— reads a project spec (@project_spec.md) and converts the functionality bullets into discrete GitHub issues, breaking a big project into actionable units./update-docs-and-commit— updates project documentation and creates a commit after a feature is finished./whats-next— consults open GitHub issues, commit history, and the spec doc to suggest the next task.
To create one, just ask Claude: describe the command name and what you want it to do. Claude handles the scaffolding.
/create-issues from the product functionality bullets in @project_spec.md
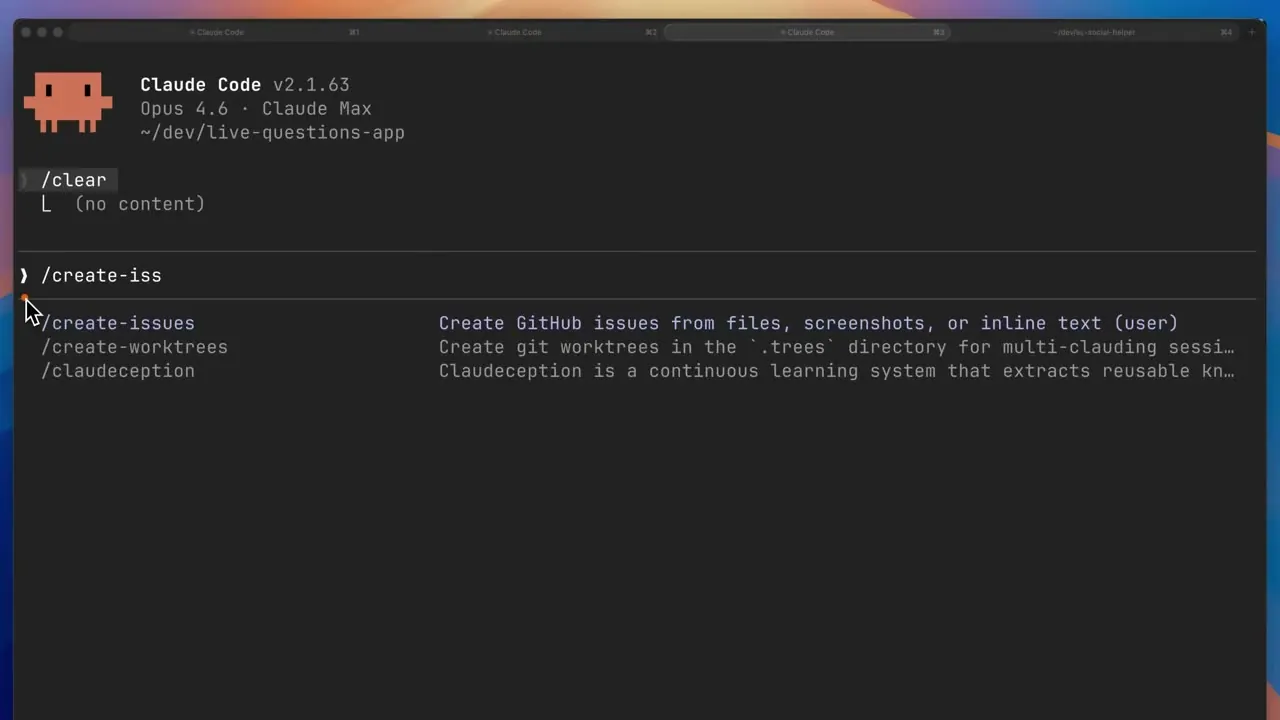
The autocomplete menu in Claude Code shows available slash commands — including /create-issues, /create-worktrees, and /claudeception — with their descriptions inline, so the team can discover them at a glance.
Tip 23 · Use MCP Servers to Connect Third-Party Tools
MCP (Model Context Protocol) extends Claude Code's reach beyond the filesystem. Think of it as "USB-C for AI tools" — a standard that lets Claude both read information from and take actions in external services.
The MCP ecosystem now covers most of a standard web stack:
- Playwright MCP — browser automation and end-to-end testing
- MongoDB / Supabase MCPs — database reads and writes
- Vercel / Cloudflare MCPs — deployments and infrastructure operations
All of these map directly to the sample tech stack (Vercel, Next.js, MongoDB, Supabase, Cloudflare R2) that Claude Code is built to work with.
Installation is straightforward: follow the official docs for each tool and Claude walks you through setup.
Skills, Plugins, and Subagents
Skills, plugins, and subagents form a layered customization system that lets Claude carry specialized knowledge, adopt community best practices, and delegate work to background processes.
Tip 24 · Use Skills for on-demand specialized knowledge
Skills are files and folders anchored by a skill.md file that loads domain knowledge into Claude only when relevant — a pattern called progressive disclosure. Claude sees skill names and descriptions first, then pulls the full reference files only when needed, keeping context lean.
Recommended starter skills:
- Frontend Design — Anthropic's visual polish guidelines
- Supabase Postgres Best Practices — query and schema guidance
- Expo — React Native mobile development
- Document creation — PDF, PowerPoint, Word workflows
Browse the community directory at skills.sh for a wider catalogue covering TDD, planning, marketing, and more.
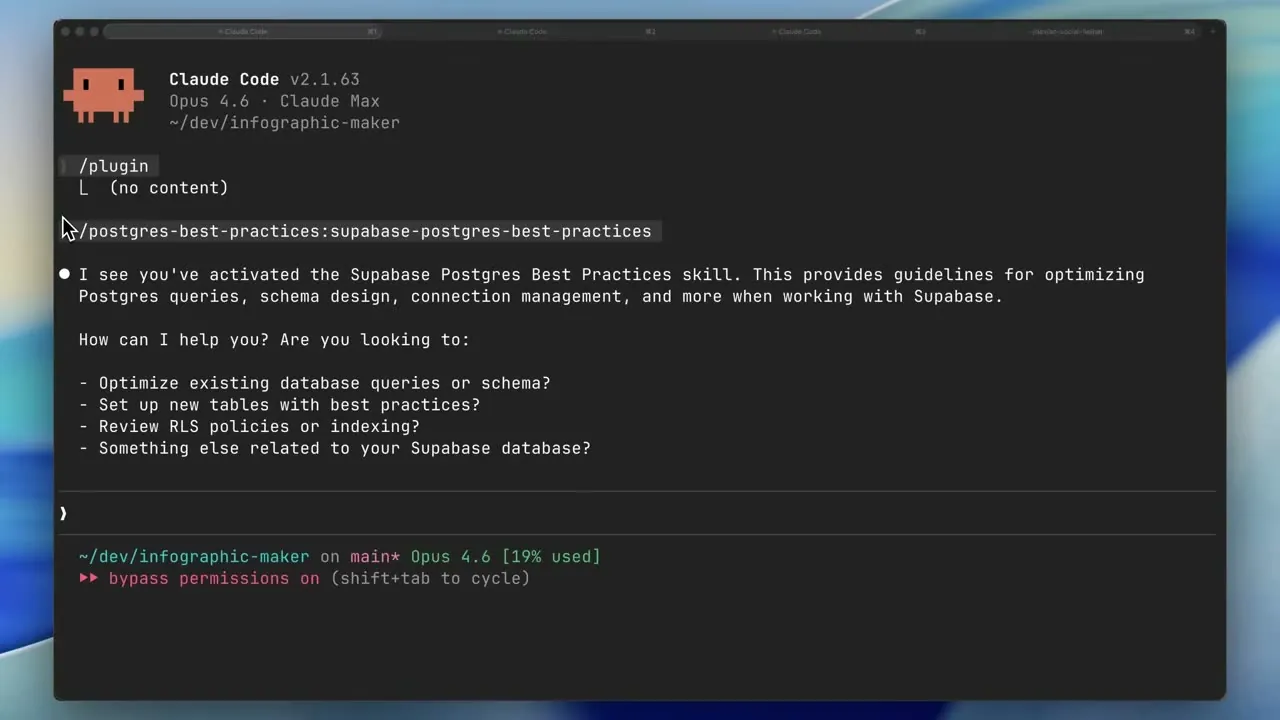
Tip 25 · Create your own Skills for personal or business knowledge
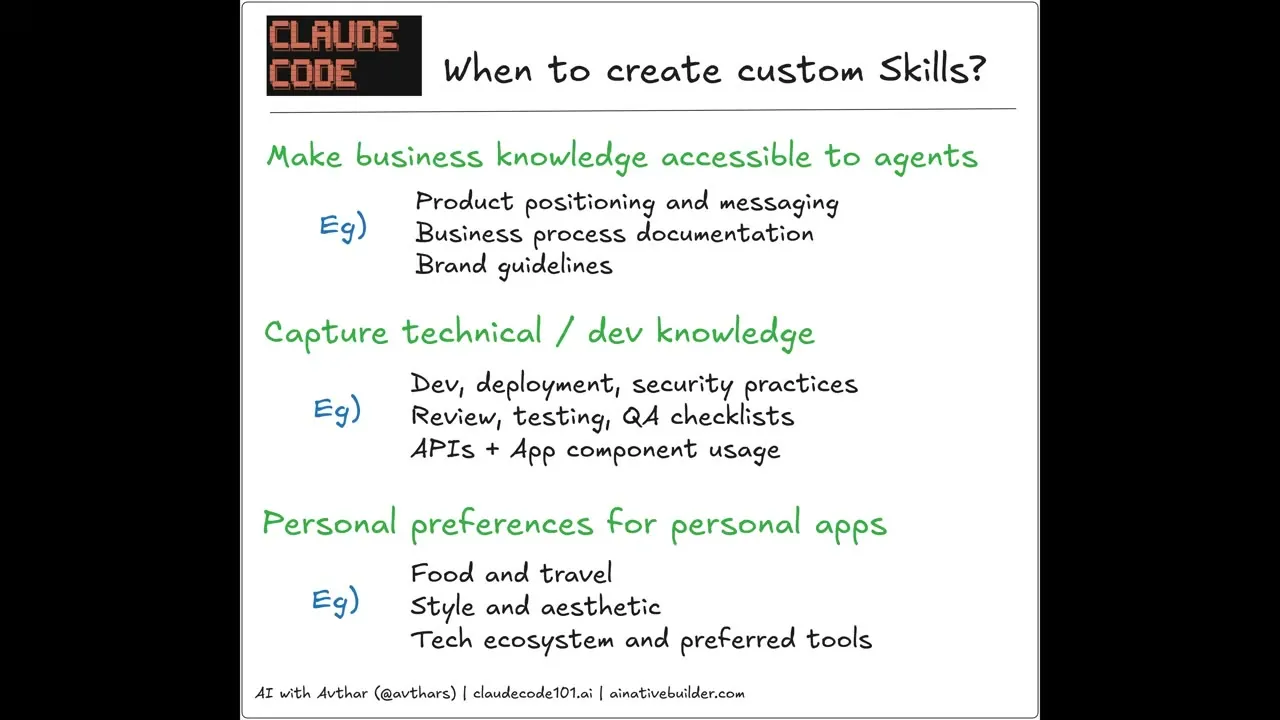
Run /skill-creator (found in the Anthropic example skills plugin) to scaffold a new skill interactively. Good candidates include company processes, brand guidelines, and dev or security standards.
Two pro tips for effective skills:
- Make the description precise — list exact scenarios, keywords, and triggers where Claude should activate it.
- If a skill isn't firing in a scenario you expect, ask Claude to "upgrade the description so it triggers in that specific scenario going forward."
Skills can also be invoked manually with /skill-name like any slash command.
Tip 26 · Use Plugins to adopt power-user best practices
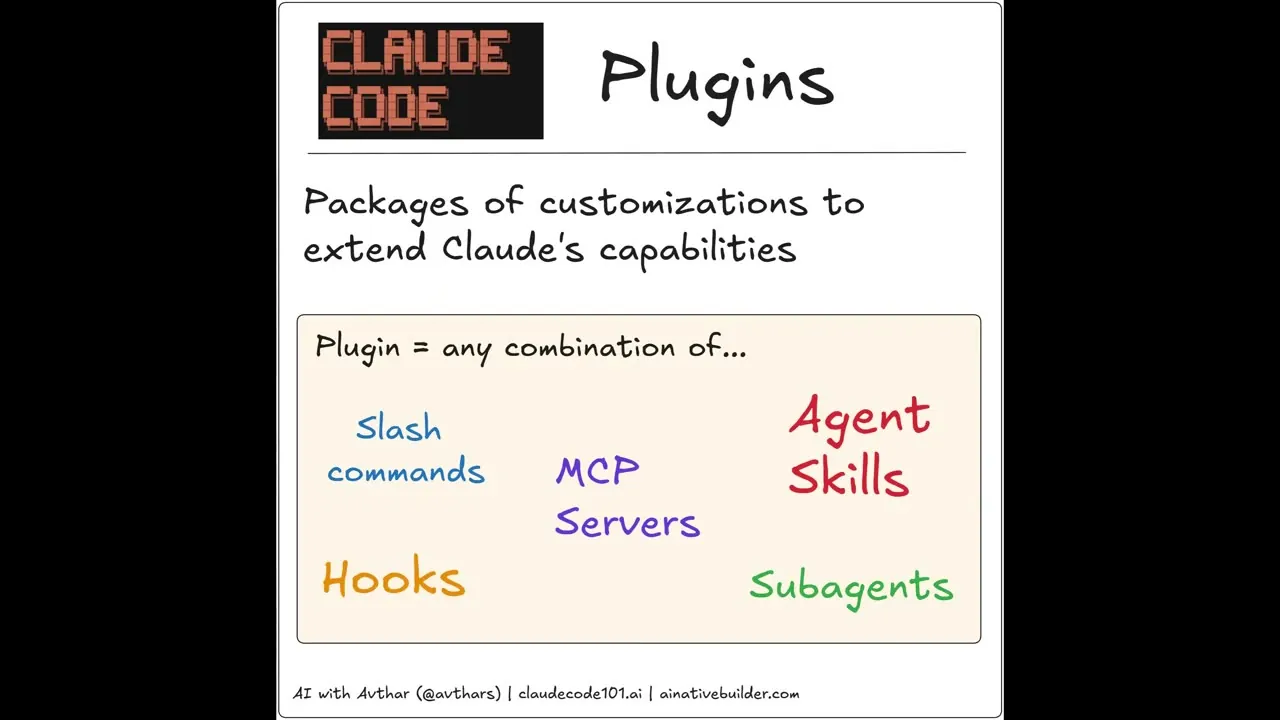
Plugins bundle slash commands, MCP servers, hooks, skills, and subagents into one installable unit. Install them with /plugin and treat plugin marketplaces like an app store.
Recommended plugins: FeatureDev, CodeReview, the relevant LSP plugin for your language (TypeScript, Python), Ralph Loop, and Compound Engineering (covered in the advanced section).
Because plugins consume context, enable and disable them on demand rather than leaving all active at once.
Tip 27 · Set the right scope for every customization
Three scopes govern where a customization is accessible:
- Local — current project only
- User — all Claude Code projects on your machine
- Project — committed to Git and shared with your team
To move a skill, plugin, or MCP between scopes, just ask Claude; it relocates the files automatically.
Tip 28 · Use the Frontend Design plugin to improve UI quality
The Frontend Design plugin loads design principles into context before Claude generates any UI. The difference is tangible: without it you get generic layouts and purple gradients; with it you get polished, opinionated designs. Enable it any time you're working on visual components.
Tip 29 · Use custom Subagents for domain-specific or background tasks
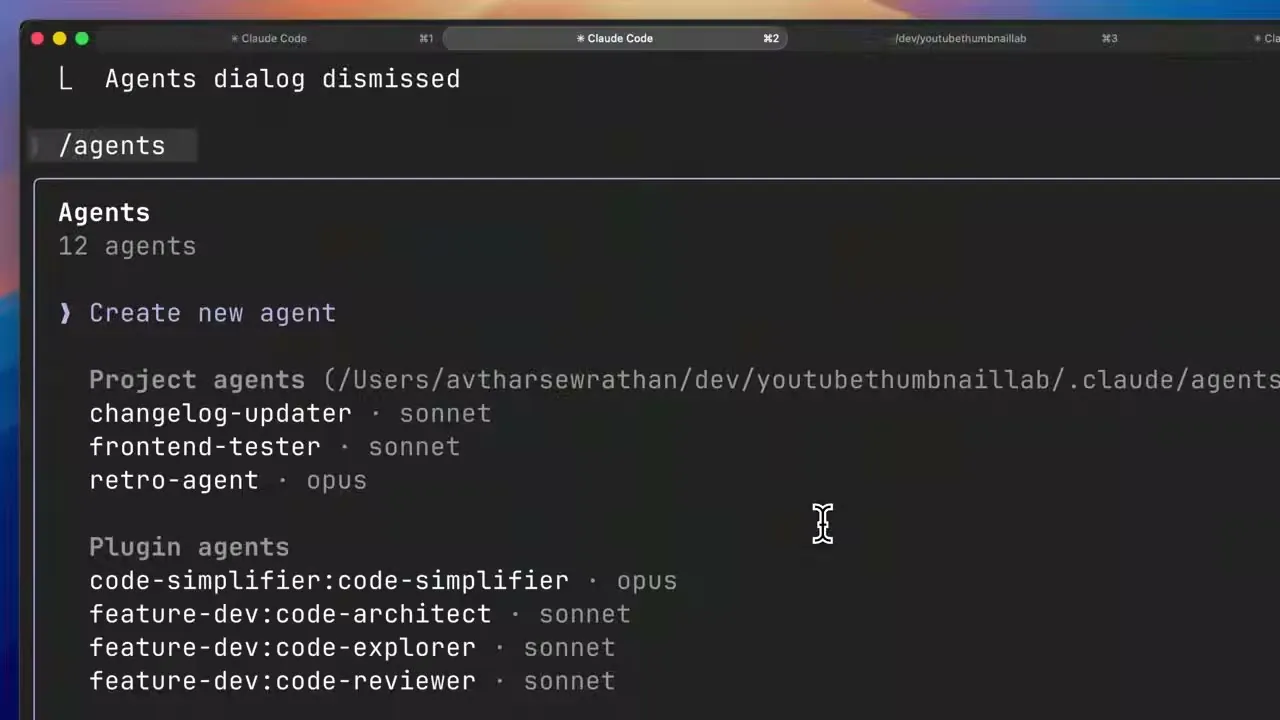
Unlike slash commands, subagents run in a fresh, isolated context window — enabling parallel and background execution. Ideal uses: end-to-end testing, changelog updates, security reviews, and research.
Create one with /agents wizard; it guides you through name, description, tools, and system prompt. Once created, Claude automatically delegates to the right subagent based on its description.
Built-in subagents include task (parallel work), plan, explore, and bash.
Tip 30 · Match customization depth to the problem
Start with community skills and plugins, then layer in custom skills for business knowledge, and finally add subagents when you need isolated, parallelizable work. Each layer builds on the last without requiring you to rebuild everything from scratch.
Spec-Driven and Issue-Based Development
Structured workflows — specs, research, tests, and issue tracking — are what separate reliable Claude Code projects from chaotic ones. Master these patterns and Claude makes far fewer mistakes and produces far more consistent output.
Tip 31 · Practice Spec-Driven Development
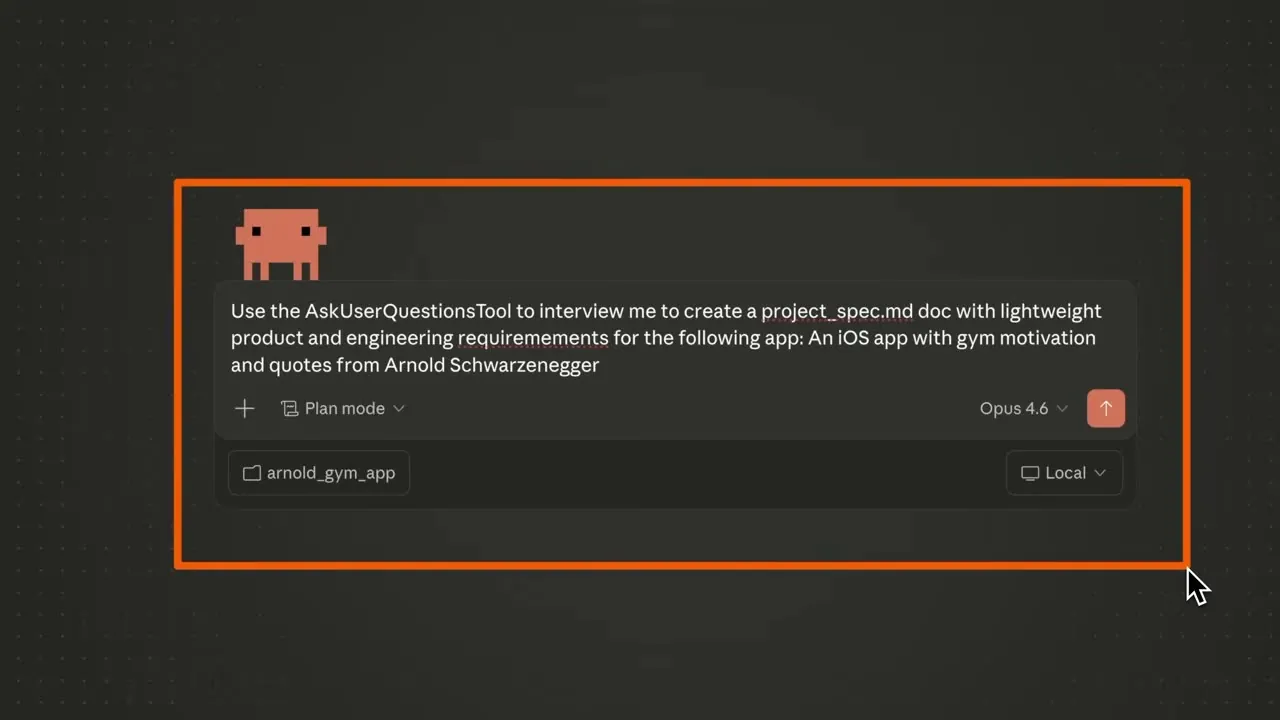
Before writing a single line of code, create a project spec doc with two parts: product requirements (what you're building and why) and engineering requirements (how you're building it). Break the project into milestones — MVP, v1, v2 — so Claude builds in phases rather than trying to deliver everything at once.
You can use Claude itself to draft the spec. Give it a high-level description and ask it to "interview you to create a project spec with product and engineering requirements" using the AskUserQuestionsTool.
Tip 32 · Use Claude Code for Research
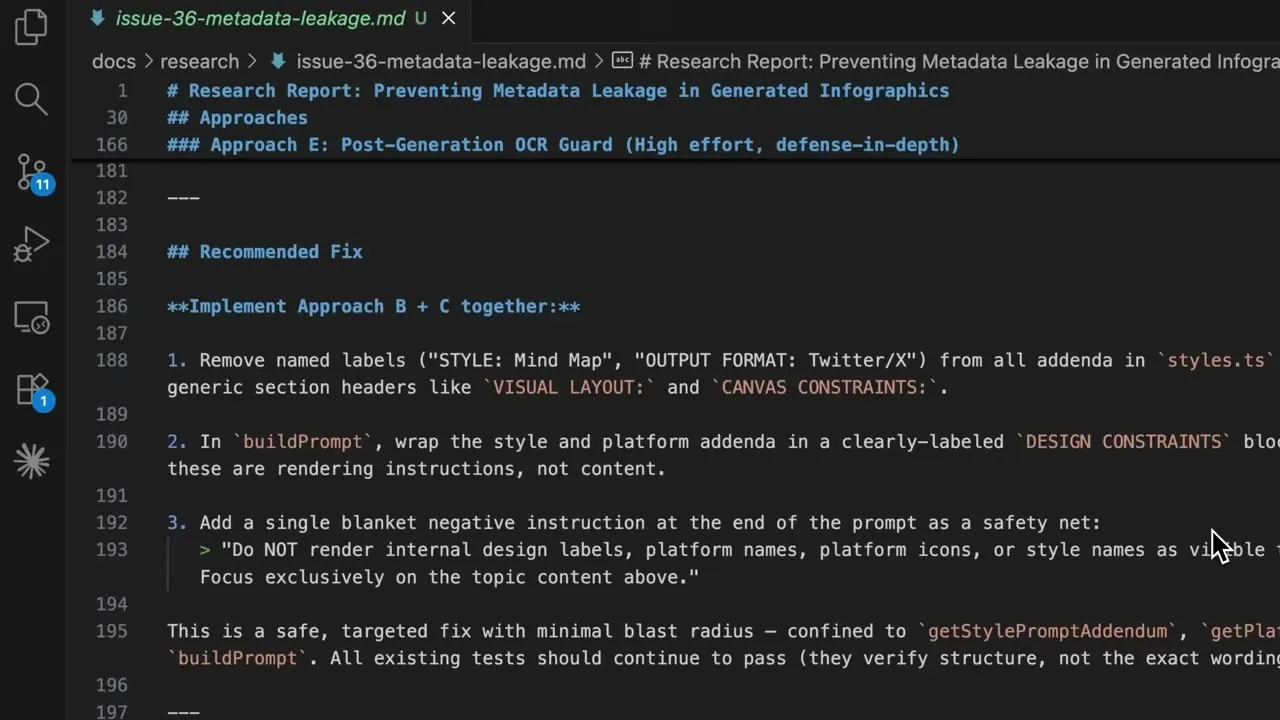
Claude can compile structured research reports via its web search tool and save them as files. Useful questions to hand off: what's the right auth solution, how should Stripe Connect be configured, which image API prompt strategy works best? The output becomes a reference both you and Claude can consult throughout the project.
The screenshot below shows an example research report on metadata leakage — complete with approaches, a recommended fix, and acceptance criteria — written directly into the repo.
Tip 33 · Practice Test-Driven Development
Have Claude write tests before implementing features, then implement only what's needed to make them pass. A custom /tdd slash command can automate the entire workflow from a feature description. TDD prevents regressions and forces Claude to understand success and failure modes before touching production code.
Tip 34 · Use the RPIT Loop for Every Feature
RPIT — Research, Plan, Implement, Test — is the core feature-building workflow. The research step surfaces relevant APIs and tech decisions upfront. Plan mode (with AskUserQuestionsTool) translates requirements into concrete steps. Implementation runs with all tools active. Testing closes the loop with unit, integration, and browser-automation checks.
Tip 35 · Use GitHub (or Linear) as External Source of Truth
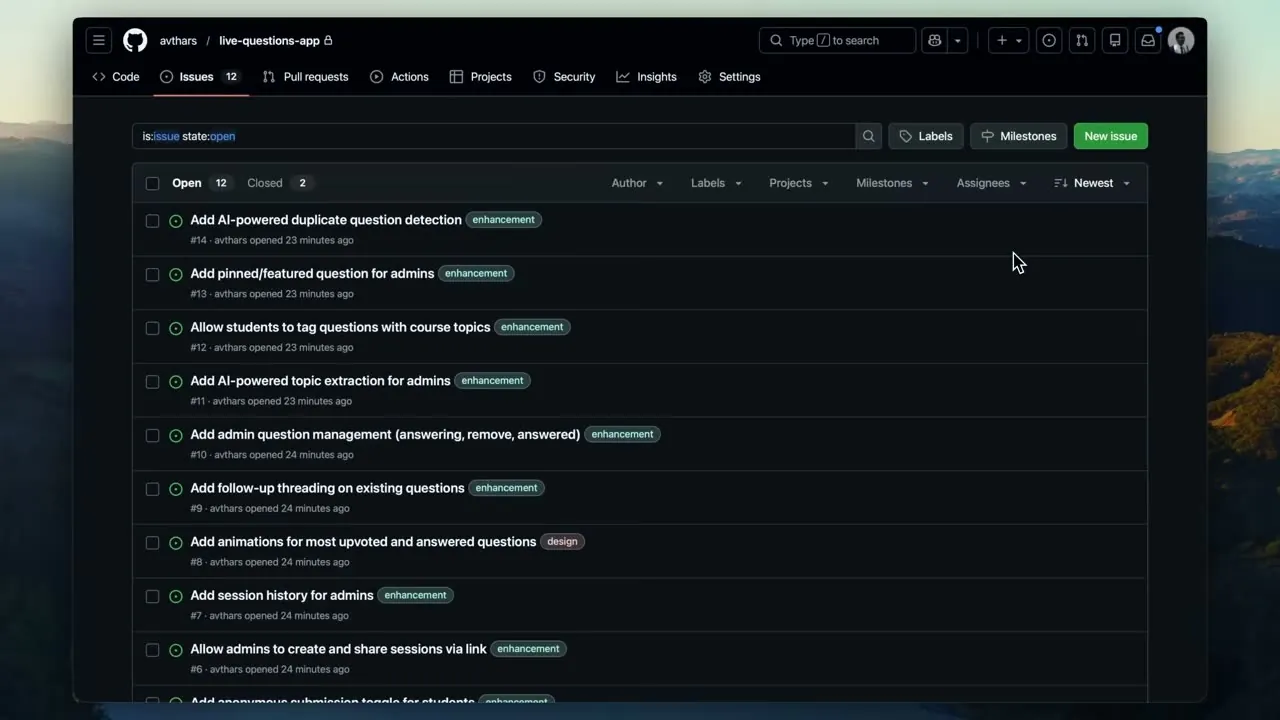
Store all planned work in GitHub Issues rather than scattered markdown files. Custom slash commands can auto-create issues from specs or analyze Git history to suggest what to work on next. GitHub CLI keeps everything in one place without extra tooling.
Tip 36 · Practice Issue-Based Development
Instead of pasting long descriptions into Claude, point it at a ticket: "work on issue 15." Claude reads the issue, implements the fix, and can close the issue and open a PR when done.
Verification and Documentation
Verifying Claude's output and keeping your documentation alive are two habits that separate productive builders from those who get stuck cleaning up AI-generated messes.
Tip 37 · Verify at Higher Levels of Abstraction
Reading every line Claude writes doesn't scale. Instead, verify at a structural level using:
- Automated code review tools
- Unit, integration, and end-to-end tests
- Security audits
- Manual and automated UX checks
Think of it like managing a smart engineer — you don't shadow them keystroke by keystroke. You define acceptance criteria and let the test suite do the talking.
Tip 38 · Give Claude a Way to Verify Its Own Work
Claude shouldn't just build; it should be able to confirm what it built actually works. Provide it with:
- Build scripts and automated tests
- Explicit success criteria
- Browser automations (e.g. Playwright MCP)
The Playwright MCP is particularly effective — it lets Claude open a real browser, navigate your app, and interact with it the way a user would. If something fails, Claude can catch it and iterate without waiting for you to spot the problem.
Tip 39 · Automatically Document Your Project
Have Claude create and maintain three core documents for every project:
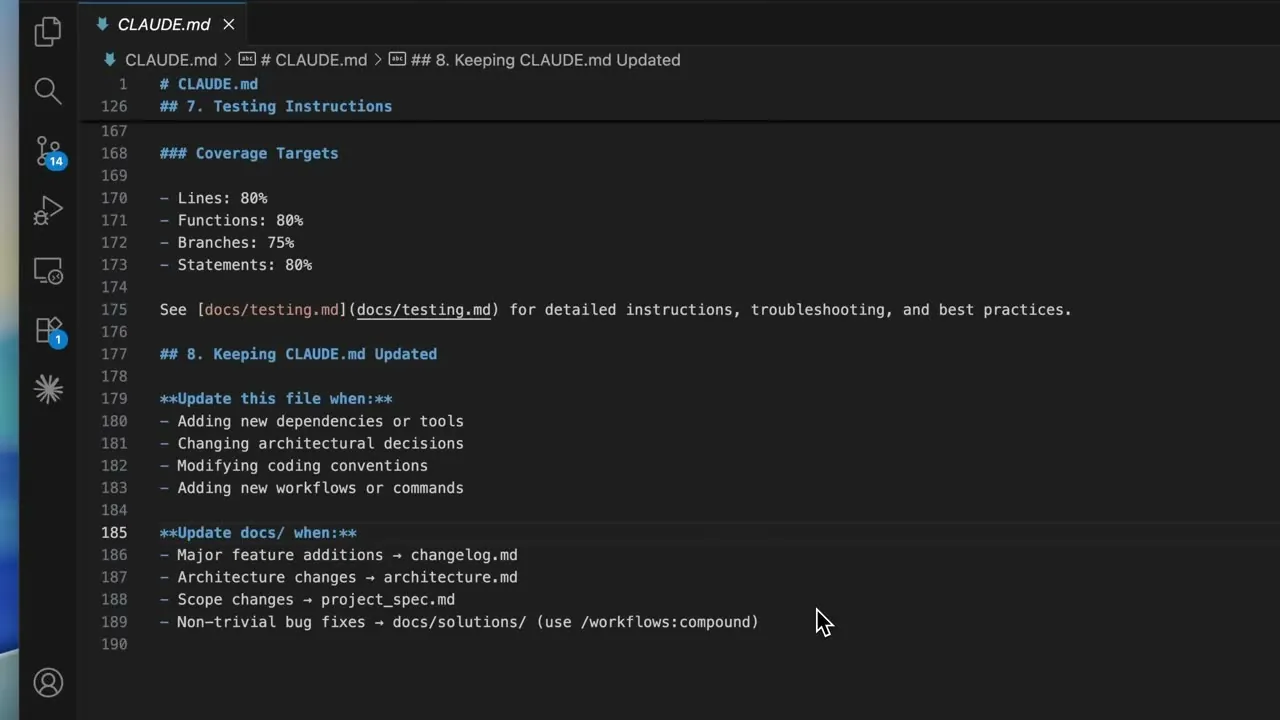
architecture.md— how the system is structuredchangelog.md— what changed and whenproject_spec.md— a living specification
Link all three from your CLAUDE.md so Claude always knows where to find and update them. A dedicated slash command or sub-agent can trigger updates automatically after each feature is merged.
Tip 40 · Iteratively Improve Your CLAUDE.md
Your CLAUDE.md is "a living document, updated as you add new features, reach new milestones, or discover new things that Claude keeps getting wrong." Don't set it and forget it.
A simple pattern: create a slash command that prompts Claude to review and update CLAUDE.md at the end of every feature or bug-fix session. Over time the file becomes a precise, project-specific manual that prevents Claude from repeating the same mistakes.
Parallel Agents and Multi-Clauding
Running multiple Claude Code instances in parallel is the highest-leverage workflow available, letting you compress a week of feature work into hours.
Tip 41 · Use Parallel Sub-Agents for a Single Feature
When one complex feature has independent subtasks, there's no reason to implement them sequentially. Ask Claude to decompose the work and spin up sub-agents for the parallel pieces. A prompt that works well:
"Break down this feature implementation, identify which tasks are independent and can be executed in parallel, and create task sub-agents for the parallel work."
This keeps a single feature moving on multiple fronts simultaneously instead of waiting for each step to finish before the next begins.
Tip 42 · Multi-Clauding: Run Many Sessions at Once
Multi-Clauding means running several Claude Code sessions in parallel, each tackling a different feature of the same project. The mental shift is significant: you stop being a pair programmer and become "the conductor of an orchestra of AI coding agents."
Practical starting advice:
- Begin with two or three instances, then scale as you get comfortable.
- Apply the testing and verification habits from earlier levels so each Claude can validate its own work before you review it.
Tip 43 · Use Git WorkTrees to Multi-Claude Safely
The natural concern with parallel sessions is file conflicts. Git WorkTrees solve this by giving each Claude its own working copy of the repo in a separate directory on a separate branch, all sharing the same Git history.
Claude Code has built-in WorkTree support via the --worktree (or -W) flag:
claude --worktree # start a session in a new isolated WorkTreeThis automatically creates a copy of the repo under .claude/worktrees/ on a fresh branch — no manual setup required. When a session finishes, push its branch and open a PR, or merge it into main or a feature branch for further testing.
Tip 44 · Use the Desktop App as Your Multi-Agent Control Center
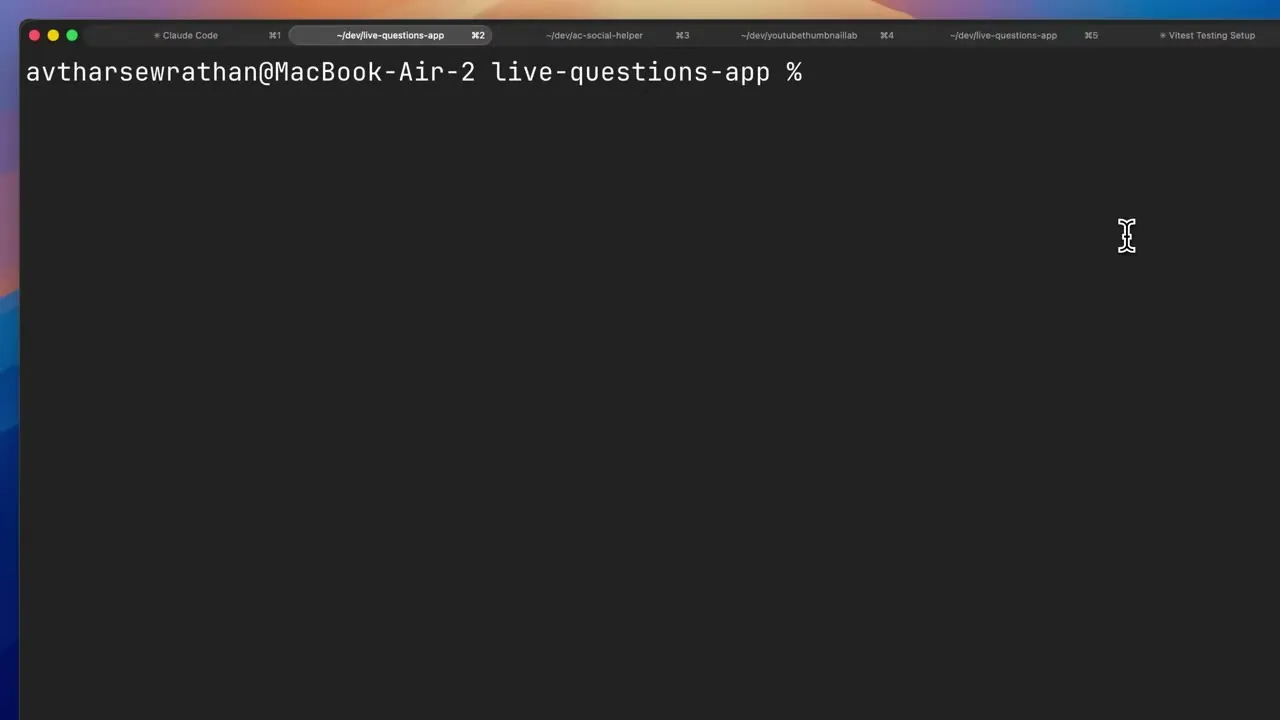
The Claude Code desktop app handles WorkTree creation for you. When starting a new session, check the WorkTree option and the app provisions the isolated branch automatically. It also provides a single place to monitor and switch between all running sessions and their WorkTrees, making multi-Clauding accessible without needing to manage directories from the command line.
Feedback Loops and Ralph Wiggum
Tight feedback loops transform Claude Code from a one-shot tool into a system that compounds its own effectiveness over time.
Tip 45 · Set Up Feedback Loops (RPIT + Reflect)
Every build cycle has two loops: an inner RPIT loop (Research → Plan → Implement → Test, with a Debug detour when needed) and an outer improvement loop that captures learnings and feeds them into the next build.
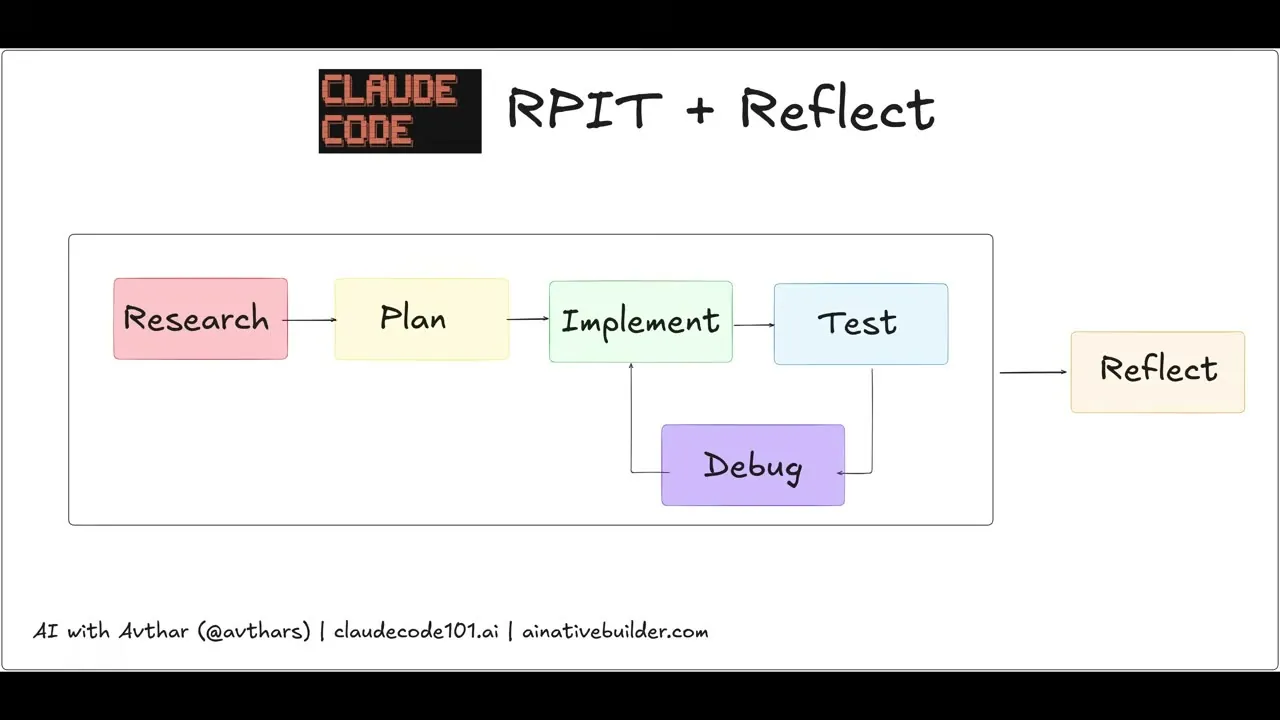
After finishing each feature or project milestone, run a retro skill that:
- Reads Git history, test results, and conversation history for context
- Reflects on what went well and what was hard
- Suggests concrete improvements to your
CLAUDE.md, documentation, and new commands or skills to create
Two plugins accelerate this process:
- Compound Engineering (from Every) — includes
/reviewand/compoundworkflows that document session learnings to make future work easier - Claudeception — enables Claude to extract and create new skills as you build, so similar problems are handled automatically next time
Tip 46 · Use Ralph Wiggum Agent Loops
For tasks with clear success criteria, use a Ralph Wiggum loop — named after the Simpsons character who just keeps going no matter what. The core idea: "persistent iteration despite setbacks is remarkably effective to solve tough problems."
The loop works like this:
The Ralph loop plugin from Anthropic provides built-in hooks that re-feed the prompt whenever Claude stops. Ryan Carson's Ralph skills plugin is a more advanced alternative.
Use Ralph Wiggum for:
- Tasks with clear, verifiable success criteria
- Iterative refinement work (e.g., working through a bug list)
- Greenfield projects
Avoid Ralph Wiggum for:
- Tasks requiring taste and judgment
- One-shot operations
- Tasks with unclear or subjective success criteria
Async Delegation and Agent Teams
The final tier of Claude Code delegation moves from single-agent tasks to fully async, multi-context workflows where Claude works without you watching.
Tip 47 · Develop Async with the Web and Mobile App
The web and mobile apps let Claude work on small features and bugs entirely in the background, across multiple repos simultaneously — each in its own sandbox session. The key is making output reviewable, not just done. After Claude finishes, create a PR so changes can be inspected and tested before merging.
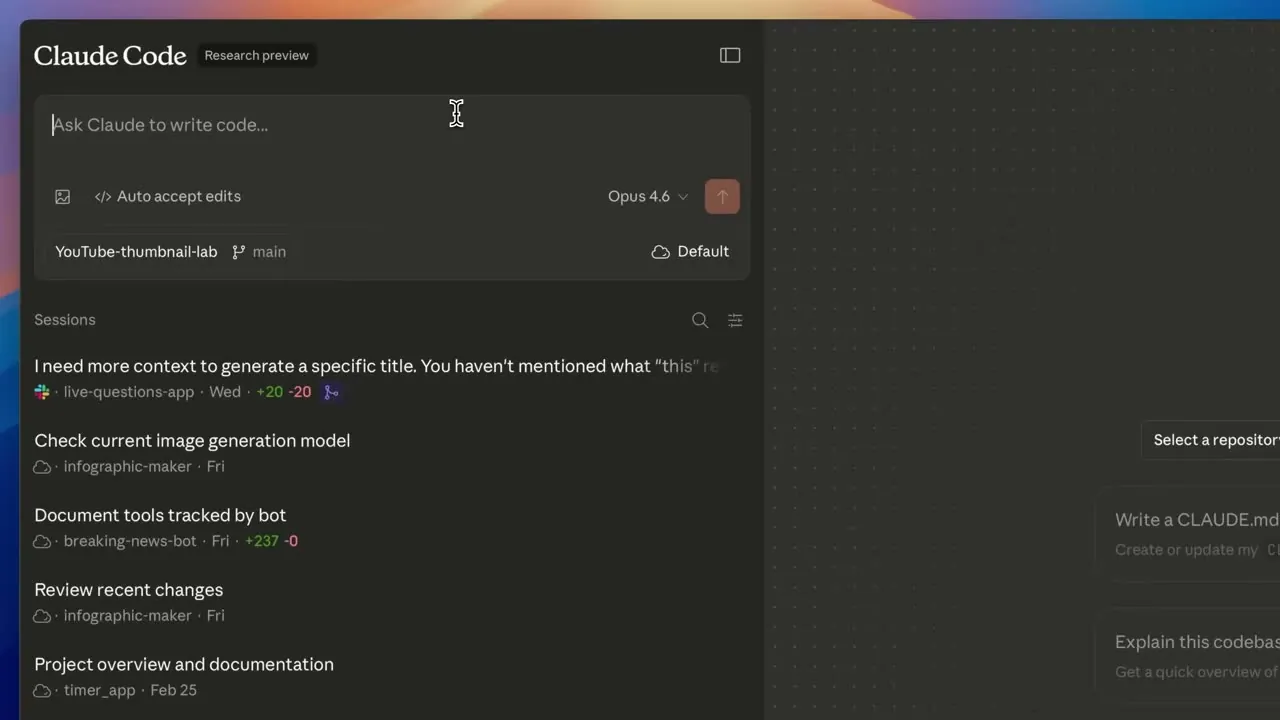
Tip 48 · Use the Claude Code GitHub Action
The GitHub Action lets Claude run directly inside GitHub — no terminal, no Claude app needed. Tag Claude in issues or PRs and it can:
- Fix bugs
- Review code and suggest changes
- Update documentation
- Answer questions about the project
Enable automatic PR review so Claude reviews every new PR in a repo. Install the integration with:
/install-github-appTip 49 · Use Claude in Slack
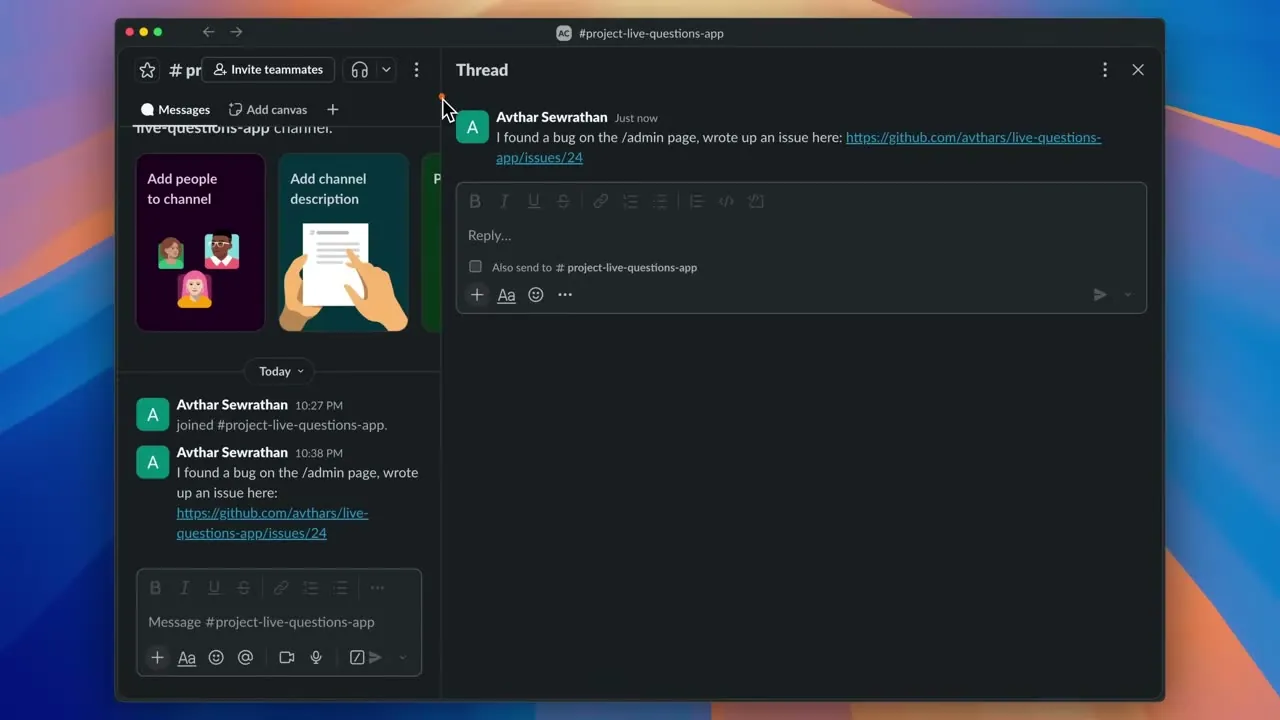
A Claude Code Slack app brings delegation to wherever your team already communicates. Tag Claude in a channel to answer questions, kick off bug fixes, or trigger PR reviews. This is particularly valuable because PMs, marketers, and executives can delegate work to Claude "without switching to a terminal or the Claude app" — no technical setup required.
Tip 50 · Run Agent Teams for Complex Features
Agent teams split a complex feature across specialized Claude instances that coordinate through a shared task list and messaging system. Each agent takes a distinct role — for example, front-end, back-end, and testing — then works in parallel.
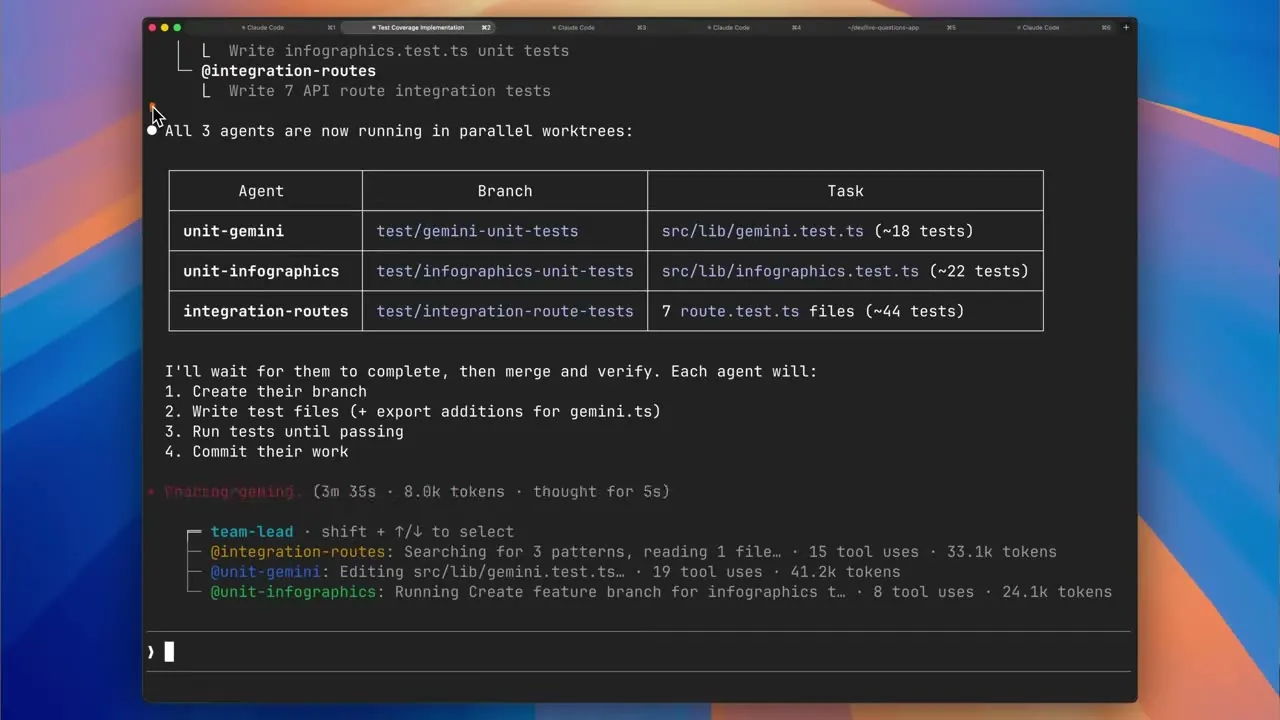
Two important distinctions:
- Agent teams — multiple agents collaborating on the same feature with coordination built in
- Multi-Clauding (covered earlier) — parallel agents working on independent features
By default, teammates share a working directory, which can cause conflicts. Solve this with worktree isolation: each agent gets its own copy of the repo so changes never collide.
Permissions, Hooks, and Wrap-Up
The final two tips close out the series by replacing risky runtime shortcuts with deliberate configuration — giving Claude autonomy without sacrificing control.
Tip 51 · Pre-configure Permissions Instead of Skipping Them
--dangerously-skip-permissions is tempting because it lets Claude act without approval prompts, but the word "dangerously" is there for a reason. The better approach is to pre-configure exactly which commands, tools, and actions Claude is allowed to run. Benefits:
- Claude can work efficiently without constant interruptions
- Guardrails stay intact for anything outside the approved list
- Configuration is written once and checked into Git, so it travels with the project
Tip 52 · Use Hooks to Add Determinism
Hooks are scripts that fire automatically at defined points in the Claude Code lifecycle — "inserting determinism into an otherwise non-deterministic workflow." There are more than ten hook events, but the best starting point is the stop hook, which fires every time Claude finishes a response.
A practical example: automatically run your test suite after every response so Claude can never proceed with broken code. That single hook meaningfully improves reliability across an entire project.
To set up hooks, use the /hooks slash command inside Claude Code, or simply ask Claude to create them. The hookify plugin from Anthropic is also available for building custom hooks that block unwanted behavior.
/hooks # open the hooks configuration UI inside Claude Code